

This car was purchased at a neighbor's estate auction. He was a body man by trade with lots of projects waiting for his attention but lost his health before getting to them. Aside from that, I have no other history on this car at this time.
The car was named by my daughter and myself one night when she decided it should have a name. The intent of the purchase is to get it road worthy and hand the keys over to my folks for them to enjoy while they still have their health. So, my daughter combined their names and the moniker 'Daryl' was born.
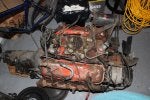
Daryl was purchased with an interior in the trunk as well as being full of parts. There was an engine and transmission under the hood, but just barely. The auction house, in order to sell the car with title, was obligated by law to sell it with an engine and transmission. Since the car didn't have either, they placed a 400SBC with a 3-speed manual transmission attached into the engine bay by way of setting the combo onto a 2x4 length of lumber straddling the upper control arm shafts.
Couldn't really tell what was all in the car or it's rust condition, too many parts to move around, but it did have seats amongst it all. Although the seats were covered, I was able to lift the corner and see what appeared to be a very nice looking seat cover. Peering under the car appeared a useable frame with no rust issues apparent.
![]()
Also purchased at the same auction was a 454ci BBC that came from a 1970's pickup but has a rod knocking. No worries, plan was to rebuild it anyways.
![]()
My neighbor fired up his Farmall H and used it to lift the engine/tranny out and put it into the bed of Dad's pickup for transport to my place as well as assist in dragging the car over to my place. No brakes, not sure if the steering would hold up, but off we went anyways because we had to get it out of there. The tires were underinflated, if I'm remembering correctly, and that helped with 'braking.' Some pushing and shoving after getting it to my place and Daryl was home and in position for where he would sit for the next year and a half while research and planning took place.
![]()
![]()
The car was named by my daughter and myself one night when she decided it should have a name. The intent of the purchase is to get it road worthy and hand the keys over to my folks for them to enjoy while they still have their health. So, my daughter combined their names and the moniker 'Daryl' was born.
Daryl was purchased with an interior in the trunk as well as being full of parts. There was an engine and transmission under the hood, but just barely. The auction house, in order to sell the car with title, was obligated by law to sell it with an engine and transmission. Since the car didn't have either, they placed a 400SBC with a 3-speed manual transmission attached into the engine bay by way of setting the combo onto a 2x4 length of lumber straddling the upper control arm shafts.
Couldn't really tell what was all in the car or it's rust condition, too many parts to move around, but it did have seats amongst it all. Although the seats were covered, I was able to lift the corner and see what appeared to be a very nice looking seat cover. Peering under the car appeared a useable frame with no rust issues apparent.

Also purchased at the same auction was a 454ci BBC that came from a 1970's pickup but has a rod knocking. No worries, plan was to rebuild it anyways.
My neighbor fired up his Farmall H and used it to lift the engine/tranny out and put it into the bed of Dad's pickup for transport to my place as well as assist in dragging the car over to my place. No brakes, not sure if the steering would hold up, but off we went anyways because we had to get it out of there. The tires were underinflated, if I'm remembering correctly, and that helped with 'braking.' Some pushing and shoving after getting it to my place and Daryl was home and in position for where he would sit for the next year and a half while research and planning took place.


