Chevy Tri Five Forum banner
1 - 14 of 14 Posts

GarinH

· Registered
Joined
·
934 Posts
Discussion starter · #1 ·
I just want to know the proper way to wire this gauge to my 57 Nomad.

the stock one that is broken had only 2 prongs on the back of it, the replacement one has 3, and one of the prongs has has a IGN 12V next to it.

the car has 2 wires that connected to the original gauge, 1 hot wire and 1 ground, I believe the wire colors were tan and brown.
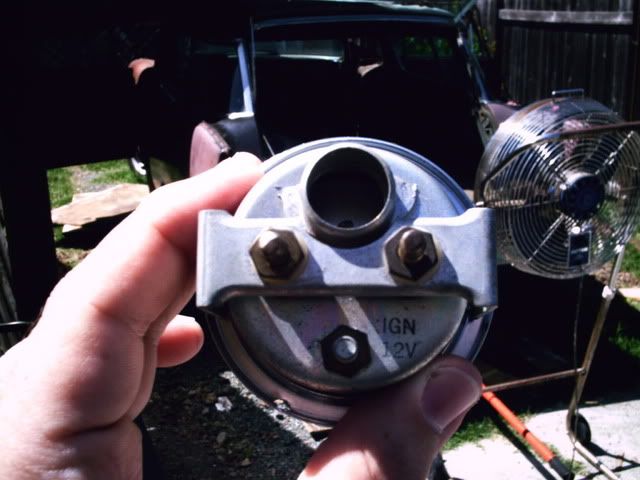
Image


connecting the tan and brown wires wont do anything, so then I ground the gauge, and the needle flys instantly to F, if I swap the brown/tan the needle then it does nothing (reversing the wires would make the needle fly to E right?).

the reason I am confused with this:
1# im pretty sure I dont have a full tank so why would it shoot to F?

2# does the IGN 12V need to connected to anything? the gauge seems to work without it connected to anything.

I'm not worried about the wires on the sending unit end, I'm not going to remove the gas tank just so I can check those wires unless there is a way to get to them without dropping the tank.

I just want to make sure this gauge is wired correctly before I put the dash cluster back in.
 
The tan wire connects to the drivers side terminal of the gauge as it's mounted in the car. The brown wire on the passenger side terminal. The metal part of the gauge is grounded to the body when mounted to the car so it has to be grounded to work.
If the gauige is going past full when power is applied, the sender in the tank is bad, the tank is not grounded, or there is a bad connection in the brown wire to the tank.
Temporiarly ground the brown wire with power applied and see if the gauge goes to empty. If so, the gauge is probably good.
The other screw doesn't need to connect to anything.
 
Discussion starter · #4 ·
The tan wire connects to the drivers side terminal of the gauge as it's mounted in the car. The brown wire on the passenger side terminal. The metal part of the gauge is grounded to the body when mounted to the car so it has to be grounded to work.
If the gauige is going past full when power is applied, the sender in the tank is bad, the tank is not grounded, or there is a bad connection in the brown wire to the tank.
Temporiarly ground the brown wire with power applied and see if the gauge goes to empty. If so, the gauge is probably good.
The other screw doesn't need to connect to anything.
ok, tan wire to driver side post, removed brown wire (passenger side post), grounded the gauge itself.... needle stayed at E, when touching the brown wire to passenger side post the needle would shoot to F, then removing the brown it would instantly shoot back to E.

so there is nothing wrong with the gauge or the way I'm connecting the wires, it probably is the connection to the sending unit then or the sending unit itself, I figured as much.

to get to the sending unit of a 57 Nomad you need to remove the gas tank right? and with 57 nomads to drop the gas tank you first need to drop the back axle don't you???
 
ok, tan wire to driver side post, removed brown wire (passenger side post), grounded the gauge itself.... needle stayed at E, when touching the brown wire to passenger side post the needle would shoot to F, then removing the brown it would instantly shoot back to E.
Yes, tan wire to terminal above ign 12V, BUT the needle should go to past full without the brown wire connected. Are you sure it's not a temperature gauge instead of a gas gauge?
Gas gauge.
Image
 
Discussion starter · #6 ·
Yes, tan wire to terminal above ign 12V, BUT the needle should go to past full without the brown wire connected. Are you sure it's not a temperature gauge instead of a gas gauge?
Gas gauge.
Image
the gauge is not the stock gauge, it also says Fuel on it on the front side, so I'm 100% sure is a fuel gauge.

while looking at the face of the gauge.
with only the tan wire connected to driver side terminal (and the gauge grounded) the gauge does nothing.
if i touch the brown wire to the passenger side terminal needle goes to full (and beyond if it could go farther).
removing the brown wire, the needle will instantly go back to empty.

should i reverse brown/tan wires?
the tan wire is hot, the brown is ground.
 
That gauge will probably not work with the sender that is in the tank. Gauges are made to work with different senders. The tri-5 sender goes from zero ohms empty to 30 ohms full. Later model gauges (65 and later) have a zero to 90 ohm sender, and still other gauges senders (Ford) go from 290 ohms empty to zero ohms full (backwards from early GM.)
The brown wire is NOT ground, it is connected to the sender and the sender changes the resistance (zero to 30 ohms) to the gauge, depending on the amount of gas.
 
Discussion starter · #8 ·
That gauge will probably not work with the sender that is in the tank. Gauges are made to work with different senders. The tri-5 sender goes from zero ohms empty to 30 ohms full. Later model gauges (65 and later) have a zero to 90 ohm sender, and still other gauges senders (Ford) go from 290 ohms empty to zero ohms full (backwards from early GM.)
The brown wire is NOT ground, it is connected to the sender and the sender changes the resistance (zero to 30 ohms) to the gauge, depending on the amount of gas.
bummer, well maybe i can fix the stock original gauge
 
Garin....Maybe the stock gauge was not bad in the first place......What were the symptoms that made you thoight it was?
 
Discussion starter · #10 · (Edited)
Garin....Maybe the stock gauge was not bad in the first place......What were the symptoms that made you thoight it was?
one of the wires connecting the prongs broke, i could easily reattach that, and a metal piece keeping the gauge attached to the back piece(that the ligthbulb attaches to) broke.
so the face of the gauge was loose, the only thing keeping the face attached to the back were the tiny wires.

I'll have a picture in a sec
.
.
.
Image


something in the middle of the 2 prongs wittch holds the 2 pieces together broke.


after soldering the wire back on, i tested the gauge and it works.
i just need to figure ouy how to keep the gauge together... I'm thinking of just trying epoxy
 
Discussion starter · #12 · (Edited)
i think the part thats broken has to do with the way the gauge grounds to the back bracket that holds the light.
I'm going to epoxy the gauge together in a couple spots that won't interfere with how it grounds.

I wont be able to test the gauge to make sure it works with the epoxy until tomorrow in the late afternoon (going to have fun at the river, weather should be nice), but the epoxy should have had enough time to set by then.
 
Way to go Garin :cool::congrats:
 
1 - 14 of 14 Posts