Chevy Tri Five Forum banner

Connecting shortened shaft to rag joint?

12K views 37 replies 11 participants last post by  joestewart98023  
#1 ·
Hey guys,
2nd post regarding my power steering conversion.
This is regarding the proper way to connect the steering shaft to the rag joint.
I have purchased these 2 kits from "tomsclassics" on eBay.
P/S Conversion Kit 1955 1956 1957 Chevrolet power steering conversion small block front motor mount | eBay
Shortened Column Kit 1955 1956 Chevrolet steering column jacket shortening kit 500 power steering | eBay

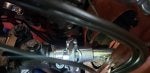
I have the p/s box mounted in the car and slipped the supplied rag joint onto the splined shaft of the input to the steering box.
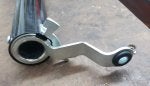
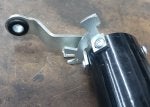
My question is the connection of the steering shaft into the other end of the rag joint. It is a DD style connection and the shaft fits into the rag joint without an issue. The issue is, what do I do to keep it secure. There are no provisions for set set screws or roll pins of any kind on the rag joint or the shaft.
Any ideas? I have also messaged "tomsclassics" on eBay about this just now but would like to hear from other that may have had this same setup.

I have attached a picture for what it's worth of the mocked up connection from the box to the rag to the shaft.

Thanks for any input.
 

Attachments

#13 ·
I don't think the roll pin would be a issue it's only purpose is to keep the shaft from sliding up & down in the rag joint not in the shaft turning inside the joint causing a loose of steering. As long as safety wire is ran through the roll pin to keep it from working its self out. I discovered when I attempted to measure my rag joint for the OP that I stated that mine was drilled through with a bolt & lock nut that was incorrect. I had done that to another car that I had installed a 500 box & shortened column in. On mine the rag joint has a set screw & the steering shaft was,once everything was set marked through the set screw hole then dissembled & drilled just enough so the set screw would properly index the shaft then the set screw was locktighted in place. Everything has to be set properly including the steering wheel or hub so the upper column bearing doesn't have any play before you make the final shaft to rag joint setting permanent.
 
#10 ·
Lee Manufacturing in Sun Valley, Ca, sell a rag joint adapter kit for the 3rd gen metric ps box. I installed a 92 F,bird WS6 ps box 2-1/4 turns lock-to-lock, fast ratio in my ,68 Camaro that had a 68 manual steering Saginaw box.. Good road feel. They may have a product for you. Their ph # (818) 768-6374.
 
#2 · (Edited)
Drill it, and pin it.
Or, as mine is, the flange is tig welded to the shaft. If I want to remove the column, I take the bolts out of the rag joint.
 
#3 ·
In the photo it appears that you only have the shaft & not the complete shortened column in place. If that is indeed the case make sure that the complete column is in place lower mount bracket bolted in place as it needs to be, including the rag joint fully engaged on the steering box shaft with the pinch bolt in its correct place before you drill the rag joint & steering shaft do this with the car sitting on all 4 wheels things will change if everything isn't in place. Also if you are going to have a column shift auto make sure the shift lever will move enough to clear the detent.I had a issue where mine would not come out of park when the steering wheel was turned in a particular position it was making contact with the rag joint bolts not hard to fix once I found the problem. PS there 2 different length rag joints the shorter of the two is preferable usually.
 
#6 ·
Thanks for your replies guys.
The picture is just a mock-up, as the column tube is not yet installed.
If I were to go the route of drilling and installing a roll pin with safety wire, Do you have recommendations on what size hole/pin?
56ls408 - From my photo, can you tell from my photos if I have been supplied with the longer or shorter rag joint?
Thanks everyone
 
#7 ·
Hard to say from a photo I went out & attempted to measure mine I'm unable to get a accurate measurement due to my Hydraboost unit with all its hoses but the best I can tell the upper portion that the shaft goes into to the front of the flange measures as close as I can tell to1" the overall length of the rag joint appears to be about 2.5-2.75" less than 3 anyway.In your photo the upper portion appears longer but again impossible to say from the photo.I wouldn't go changing anything that you currently have till you have everything mocked up on most these shortened column installs if yours is column shift the lever usually just clears the firewall enough to have full movement.If it's not a column shift without the shift lever it's probably a easier install.
 
#18 ·
Thanks for all of the input from everyone.

Another question is regarding the preferred order/method of putting this together.
Here is what I am thinking but not sure if this is the best order to do things or if it matters.

1. Mount steering box to frame. (Done)
2. Attach rag joint to splined shaft on steering box. (Done but not tightened yet)
3. Attach steering shaft to rag joint by either roll pin/safety wire or drill set screw/dimple or weld. (Haven't decided which method)
4. Slide column mast/jacket/tube (not sure what the correct name is) with internal gear selector linkage already loaded, over end of steering shaft inside of car and down into position. (Not sure if this method is possible separately from the shaft already being in place.

Or, do you slide the shaft and mast/jacket/tube inside the car as one unit together?

Also, what holds the firewall end of the mast/jacket/tube in place if not the original engine side firewall mounting clamp bracket?

One other thing, when is the best time to run the wires through the mast/jacket/tube?

Thanks for help with any guidance on the proper order to avoid getting myself stuck.

I'm getting close on this and excited.
 
#19 ·
Do not drill weld or attach the shaft in any way until you confirm it's length. there are at least a couple different lower mount options that you can get they will attach to the inside of the firewall using the current nuts in the firewall. There isn't enough room with the rag joint to use the clamp as it was originally on the outside.The shaft has to be the correct length which means it may have to be shortened some. If not correct then the upper bearing won't support the shaft correctly & your steering wheel will have play up & down. I went back & looked at your first post showing the kit you have.You have the correct lower mount, you will need to slide that mount plate down from the top side to with in a few inches from the bottom or remove everything out of the tube & install the plate from the bottom.In the photo it appears that there isn't a lower mast jacket bearing at the bottom of the column tube if that is correct it has to be there or the shaft will not be supported at the bottom. I in no way am trying to be critical but from some of the questions you are asking you may be ahead to spend the money & buy a complete column or have someone that has done this before give you a hand this is something that has to be done correctly or you are taking your life in your own hands. You need step by step instructions & follow them to the letter if you are going to put this together yourself. you are welcome to send me a conversation or what was called a PM & I would be glad to then talk to you there is too much to try & put in a post to fully answer the questions you posed.
 
#21 ·
I went back and looked at you kit aslo the rag joint from Toms classics would NOT work for me...i suspect it will NOT work for you either.....I got mine from CPP ....it was shorter and already had the hole predrilled and came with the roll pin...........there was NO way ...i repeat NO way I could begin to use that longer one!!!!!
 
#27 ·
Thanks KRUNK !!!,
Today I mocked up fitment of the shortened column to the steering box. As you noted, the rag joint does NOT look like it will work. As you can see (picture), there is NO/ZERO clearance for my automatic trans gear selector to move/actuate inward to the engine bay to clear the detents on the bracket. There is zero clearance. Basically, I would be stuck in park. Not to mention, It looks like the rag joint on the DD end would bind/grind against the shifter detent collar when turning the wheel.
Looks like I need to buy the CPP low profile rag joint like this one here on eBay.
NEW CPP MINI RAG JOINT 1" DD x 3/4"-30 400 SERIES 500 SERIES POWER STEERING | eBay

It would have been nice if someone at tomsclassics would have noted I was buying their p/s kit and shortened column for column shift which would have a rag joint that would not work. :(

If you are going to use a 3 or 4 speed automatic then you need to change the little detent bracket mounted at the bottom of the column with one that allows more travel. Look at the one offered by Danchuk that is specifically made for that purpose. You will also need a different neutral safety switch that will enable starter engagement in park & neutral correctly if using 3 or 4 speed auto just a thought looking at your parts.
Thanks 56ls408,
I do have a TH400. Maybe I can transfer the detent bracket off of my stock column over to this shortened one?
 

Attachments

#22 ·
Thanks 56ls408 and KRUNK !!!
I appreciate your willingness to help out very much.
For starters, it sounds like I will need to order the CPP rag joint as KRUNK !!! mentioned. Do you happen to have a part number? I'd like to get that on order.
I did purchase the pre-shortened kit which included the shortened shaft as well.
As for no bearing at the bottom end of the mast jacket, that is correct.
As there were no instructions included with the shorted kit, I'm not sure what the manufacturer intended for supporting the shaft in the bottom end of the mast jacket.
 
#24 ·
Here are pictures of the shortened column kit including the label from the box.
I didn't take a picture of the shaft which was in this kit as I have it mocked up in the car right now.
 

Attachments

#26 ·
If you are going to use a 3 or 4 speed automatic then you need to change the little detent bracket mounted at the bottom of the column with one that allows more travel. Look at the one offered by Danchuk that is specifically made for that purpose. You will also need a different neutral safety switch that will enable starter engagement in park & neutral correctly if using 3 or 4 speed auto just a thought looking at your parts.
 
#28 ·
From your photo looks like you might be able to pull the column slightly back into the car just as long as the shift lever will clear the firewall & move full range but it certainly won't work with that rag joint. You will need the shorter version & even then mine if the wheel is in a certain spot the shift lever will touch one of the bolts going through the rag joint just enough to feel a little pressure when shifting out of park, at first it would bind till I repositioned the two parts.If the detent on your original column hadn't been changed it won't be any different that what came with the new one Danchuk 2358A for 55-56 2359A for 57 using 3 or 4speed autos
 
#29 ·
I also got the kit from Toms classic.....besides the rag joint that didnt work... I also got a new powersteering pump that was faulty........it just figures huh?.....I had to shim my powersteering 500 box slightly to center it in the correct spot.....otherwise it would have wore the column bearing out sooner than later....after shimming it is smooth as silk