Chevy Tri Five Forum banner

The infamous front coil spring question

12K views 46 replies 15 participants last post by  ChuckG  
#1 ·
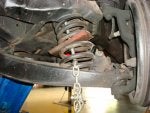
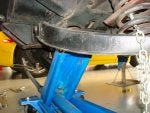
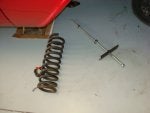
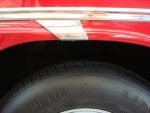
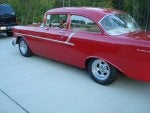
so i put in the drop coils in the front from classic chevy. and well it is not as low as i would like it. has anyone cut one full turn off these? i dont want to to do the disc upgrade and drop spindles yet do to money and i just rebuilt the brakes on the beast.


wood
 
#5 · (Edited)
AS Don said....Don't tighten the control arm bolts until you have full weight on the car.....Then drive it for a bit a see if they will "settle in" some.
 
#6 ·
Which springs you cut is kind of a crap shoot. If the new springs lowered the car, cut them, you have a head start. One coil will lower the front end around 1" to 1-1/4". Two coils on the same end a lot more.

Your used lowering springs aren't worth much now anyway. So cut the springs that you think might get you want you want. You don't have a lot to lose now.
 
#10 ·
Well, I'm getting ready to cut a coil off of my front springs as I read this.

I'm just hoping one coil will be enough. I've heard conflicting reports on the amount you can lower the car with each coil removed.

Rick says 1 to 1 1/4 inch. That seems to be the "norm". I've read others say 2 inches/coil. I dunno.

I am curious about one thing. You say IF you cut 2 coils from the same spring end, it's a LOT more. I assume by that you mean that cutting 2 coils from the same end would lower the car more than 2 to 2 1/2 inches (2 times the "one coil" amount). Is this so?

Does it matter if you cut from both ends? Is one end better than the other? I'm just curious.

Chuck
 
#7 ·
i am running small tires 5.75 biasply the lowering springs are new just want to get rid of the gap i could always go with a taller tire.

the old springs were cut ones on top and once on the bottom just to get it on the trailer home. the guy i got it from was going to air bag it so we just put those in to get it on the trailer.

crap shoot yes!!!
we will see what happens
 
#12 ·
NICE, Mike. Thank you for posting the pictures.

Looks like about 1.5 to 2 inches.

Is that about right?

Chuck
 
#13 ·
this might help, it might confuse.........it's from a car craft magazine WAY back in the 80's
 

Attachments

#14 ·
WAY beyond my little pea brain, Gary. :D

Chuck
 
#17 ·
I've got a three inch drop on mine by cutting coils but it rides like a truck!
Soon as i can i'll go to drop spindles and ECI no offset discs.
A 3" drop seems a little "radical" to achieve by cutting coils.

How many did you remove? I would guess 2 or 3.

I would think you might have problems keeping the springs in the pockets if too many coils were removed, especially when you jack the car up.

Chuck
 
#19 ·
Thanks, Mike.

I think that's exactly what I'm gonna do. 1.5 inches would be perfect for me.

Chuck
 
#23 ·
Well, I made up a new coil spring compressor using a 2 foot piece of 1/2 x 13 Allthread, some washers, nuts, AND a chunk of steel cut from an old Snapper lawn mower blade. :D

The steel is about 3/16 thick.

Here's my creation, very similar to the pix I posted of my previous one, lost in action in the move from Maryland to Florida.

Been BRUTALLY hot here for the past 5 days or so. Temps near 100*, heat index pushing 108*. :eek:

Gonna wait till things cool down somewhat, then begin my "cut the coil" project.

Chuck
 

Attachments

#25 · (Edited)
Well, I made up a new coil spring compressor using a 2 foot piece of 1/2 x 13 Allthread, some washers, nuts, AND a chunk of steel cut from an old Snapper lawn mower blade. :D The steel is about 3/16 thick.....Here's my creation, very similar to the pix I posted of my previous one, lost in action in the move from Maryland to Florida....Chuck
Good job Chuck :):tu (Not trying to one-up 'ya) I didn't want to scratch up the paint on my lower A frames, when I put mine back together.....So, I connected an eye bolt to the all-thread with a coupler nut and used the lower section of an old shock to secure the compresor to the lower control arm.

Image
 
#24 ·
Here's my old one that's "MIA".

Also made from 1/2" Allthread. Used a chunk of boilerplate on the bottom.

Chuck
 

Attachments

#27 ·
BTW, this is a good place to ask................

I've heard conflicting stories as to whether to cut an UPPER coil or a LOWER coil.

Most tell me to cut an UPPER.

Whatcha think?

Chuck
 
#28 ·
It shouldn't matter whether you install the spring with the shortened end up or down.

You do need to put the end (tail) of the spring in the recess provided for it in both the frame (upper) and lower control arm (lower).

That is also why you should shorten the spring in one coil increments, to preserve this relationship.
 
#29 ·
Well, I'll wait and see when I get them out. I can tell you that now, as the car sits, the lower "ends" are NOT in or near the hole/pocket in the lower A Frame.

Of course, I can't see into the upper area. I "ASSUME" these are the original coils, but I honestly don't know. Some coil springs I've seen have rounded coils and ends on one side, and a flattened coil on the other.

Other springs have rounded coils on each end. Some are wound tighter on one end/looser on the other. Depends on whether they're progressive or not.

Not sure what these'll look like when I get 'em out. Regardless, I'm cutting one coil.....from a rounded, not flattened end. :D .

Chuck
 
#30 ·
Well, the deed is done. Started on the project today at about noon. Finished up at about 4 PM. Got both front springs out without problems.

I used my spring compressor and a floor jack. Some of youze guys had me worried about the length of the Tri 5 spring. I didn't find it much different that any Corvette spring I've changed.

I'd guess these are the original springs. This car only had 90K original miles on it. NOW...on to my questions.

The springs are symmetrical. Measuring from the topmost coil to the next coil is only a tick over 1 INCH.

Will removing this 1" coil result in a 1.5" drop or just a 1" drop?

Could you remove one coil from the top and one from the bottom to get a 2" drop, or would 2 end coils be too much?

Reason I ask....the distance between the other coils under load is 1.5 inches.

Thoughts? Here are some pictures.

Chuck
 

Attachments

#31 · (Edited)
"Will removing this 1" coil result in a 1.5" drop or just a 1" drop?"

You'll get 1" at the spring - and about 1.5" at the wheel. If you look at the lower control arm geometry the wheel moves farther than the spring pocket when you rotate the lower control arm through a given angle.

I think the factory specs have the motion ratio at about 3:1. The displacement ratio is the square root of that, or 1.7:1. So theoretically you'd get a 1.7" drop, but it probably won't be quite that.
 
#32 ·
Good thought, Rick. I wasn't thinking of the geometry of the assembly.

If it pivots at the inner shaft, taking 1" off the spring would result in a greater drop at the wheel/hub.

I just want to do this ONCE. :D Don't want to cut one coil, put it back together, and then have to do it again.

I think one coil will make me happy. The thing that got me thinking was in looking at the springs, I saw that they're would tighter at the ends, so there is less distance between those end coils.

Thanks for your help. :D

Chuck
 
#34 ·
Here's an update. :D

I cut one coil (upper) off of each spring.

Reinstalled them this morning. Put in new shocks too.

Had to tack weld in one shock absorber nut on a bottom A frame as the one there was stripped, drilled out, and replaced with a bolt by the PO.

The car's still sitting on jackstands. It's now about 1:45. The humidity index is over 100* :eek: an it's just WAY too hot to keep going.

I'm gonna clean up my mess, and take it off the stands later this evening when it cools off. THEN............I'll check the stance and post some before and after pictures.

Just a comment...the cut springs went in much easier than "normal height" springs. Didn't need the spring compressor. Just used a floor jack.

Chuck
 
#35 ·
Well, this is the final post, if anyone's interested.

Took the car off the stands. Drove it about 2-3 miles to shake things in. Nothing fell off, so that's always good. :D

Here are some pix. The drop was approximately 1.75 inches cutting one coil.

Chuck
 

Attachments

#46 ·
Looks really good -- for a lowered car.:D I love the color and clean looks.

I have to tell you using a torch scares the heck out of me.:eek: And you'll end up with a really rough and bouncy ride.

Once you get the stance where you want it, it's probably a good idea to get the front end aligned. When I last put my steering and suspension back together, I set toe-in with the front wheels off the ground. When I set it back on the ground, I had to re-adjust toe-in. I guess that's because the tie rods move in and out as the steering knuckles (aka spindles) move up and down. Camber may have also changed.
 
#37 ·
Not sure, Rick. I'm gonna eyeball it for awhile, and drive the car. It looks a lot better not having the nose in the air.

I might consider going a tick lower, but if I do, I think I'll go the "heat the springs with a torch" method. :D


Chuck
 
#38 ·
and it's-a '56 150, woohoo !!!
 
#39 ·
Yep, couldn't afford a 210 or a Bel Air. :D

Chuck
 
#43 ·
Thank you. :D

I still want to go a tad lower. Last night, I talked to a fellow I know who has an oxyacetylene torch outfit.

Long story short... Next week sometime, he's gonna drag his torch up to my joint and we're gonna heat the springs.

I want to go about 1" lower, and I cannot accomplish that by trimming coils.

SO....I'll rig up some blocks/bricks to place at strategic areas under the car. I'll push down on the springs till I achieve that 1" drop and place the blocks/bricks to "stop" the cars' descent at that point.

Then, we'll heat the springs, and the car will "drop" to the blocks, stopping it from going any further.

That's my plan, and I'm sticking to it. :D

Chuck