Chevy Tri Five Forum banner

Control Arm Removal Questions

7.7K views 16 replies 11 participants last post by  Rick_L  
#1 ·
Hey Everyone,

This weekend my hope is to replace the bushings on the front end. I've got most pieces ready to go, but have a question about how the process goes.

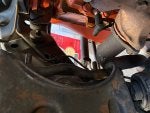
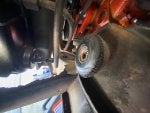
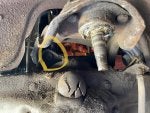
I have the shop manual, but when they talk about knocking the lower ball joint loose is where I get lost. So I understand you loosen the cross shaft bolts on the lower control arm, remove the nut/cotter pin on the lower ball joint, but then where do you go from there? If anyone had any visuals on what the manual is referring to I would greatly appreciate that, or any tricks you may have learned to make the process easier.

I did find one thread talking about loosening the upper control arm nut and using a jack to compress lower control arm, but I wasn't sure how that would work out.

Any help would be greatly appreciated.
 
#4 ·
I will have to warn you to be very careful with this job...Once the springs are under pressure, they are very dangerous.


That said....I have a few front end rebuild articles that I can send you...If you want them, send me an PM with your email address.
 
#8 ·
I will send you a PM. I would like to read through them.

For everyone else, I appreciate the warnings/guidance. I ordered some 5/8" acme all thread along with some thick 4" square washers for the bottom.

I also have a ball joint removal tool I plan to use to remove the bushings. I have seen a few threads where people have had success with it, so I am hoping it goes without too much trouble.

I will update with how things go this weekend.
 
#6 ·
I'm in the process of doing this now on my 56, however this isn't my first rodeo. Like said, there's a lot of energy in a compressed spring, they have caused bodily harm. Also you'll need to take the control arms to a shop that has a press to push the old out and new in. Good luck, be safe.
 
#7 ·
I have the front clip off on my 57, and I'm about to replace the springs and control arm bushings.
My recollection from decades ago is that the bushings can be removed from the control arm with careful use of an air chisel, or manually with a chisel and hammer. Installing new bushings can be done with a hammer, a 2x4 block of wood and a large socket of the correct size.
I built a home made spring compressor from a pipe nipple and a 3 foot piece of 5/8 all-thread I had lying around (2 feet long is probably enough). I had to buy the eye bolt and 2 long coupling nuts. Make sure to lubricate the threads, and don't use power tools to compress the spring -- otherwise you risk galling the threads and thread failure. That's one reason I used a longer coupling nut at the top.
When re-compressing the spring to install the lower control arm, one suggestion was to temporarily use a piece of all thread in place of two of the cross shaft bolts to guide the control arm into place. Another was to use a long punch to align the holes.
Vic
 

Attachments

#9 ·
There's also a few different versions of this factory coil compressor available. They can be had at some of the vendors here. The advantage to them is that they allow the lower arm to sweep down in a curve without bending the all-thread , much like that pipe nipple would in the above pic. I have one and really like it.

Image
 
#11 ·
Does anyone have any tricks for popping the ball joint loose? I have the spring slightly compressed, both castle nuts loosened to the ends of the threads and have hit just about everywhere I can think of with a hammer. Even with putting the fork in (I have the one from harbor freight) and seating it fully I still cant get the stud on the ball joint to pop free.

I am probably going to pick up a bigger hammer tomorrow and maybe a punch or rod to try and give a couple big whacks on the bottom of the upper control arm nut.
 
#12 ·
The fork or pickle fork as it is some times called come in two different sizes. There is one that is made for ball joints and another that is made for tie rod ends. The older better built forks would usually work well for both needs. But some of the newer cheaper forks are not up to doing both. The opening and the angle are a compromise as we find with a lot of cheaper made products today. Please be VERY CAREFUL in what you are doing.
 
#13 ·
If you want to reuse the ball joint, or if you just want to be able to get the castle nut off after the ball joint is loose, hitting it with a hammer or punch may make this difficult by distorting the threads.
Seems like the right size pickle fork should work no matter what, a bigger hammer or bigger fork may be necessary.
Of course, the boot or ball joint will have to be replaced.
 
#15 ·
Control arm removal

I am in the process now of rebuilding the front suspension also. Found that the book is not correct when they say remove the lower first as the pressure from the top makes it harder. Remove the upper ball joint first than the lower. mine were stuck pretty good and I had to use a good size hammer to hit the fork and had to try rotating it first in front than the middle and finally the rear, the ball joint eventually popped loose. Having a local company replace the control arm bushings. wrestled the uppers out and decided it was easier to pay them.
 
#16 ·
Hey Everyone,

Wanted to check here and get some thoughts before I went any further. Making good progress, spring compressor worked well and I have lower control arm as well as brake and spindle removed. The upper control arm seems to be stuck, I hit the exhaust where it connects to the header before I am able to pull it off of the studs.

Does anyone know if I am able to remove the upper A frame from the cross shaft while it is still installed on the vehicle? Or have any suggestions on what to try here?

I did try to unthread the studs (yellow circle), but as far as I can tell they arent moving... I'm afraid to give it too much in case they are welded to crimped to the frame.
 

Attachments

#17 ·
The shank of the stud (bolt) next to the head is knurled. This is what is holding those in the frame bracket. Tap the stud with a hammer and you might be able to break it free, but having room to swing a hammer is probably limited. On the other hand if you can remove the exhaust pipe from the manifold and let it drop down, maybe you'll have enough room to slide the control arm assembly off the studs.