Chevy Tri Five Forum banner

TORE-UP NOW!-Updates

431K views 1.9K replies 149 participants last post by  Pops @ Tri-5.com  
#1 ·
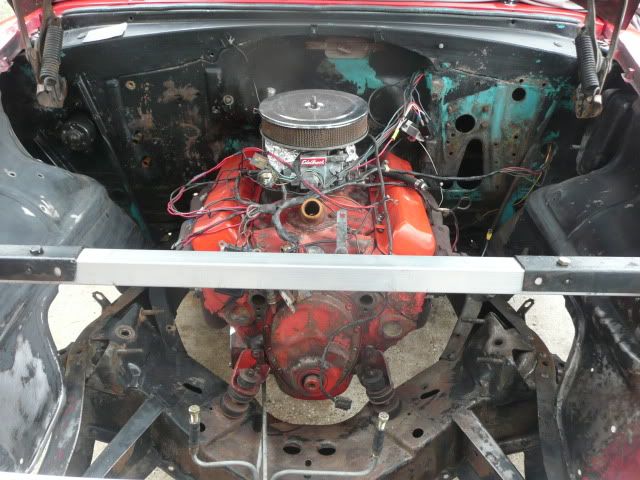
What started out as a front suspension rebuild, has turned into a case of the "might as well's"....Now it has progressed into a complete under the hood and front frame restoration project....Man, I've got it really tore up now! OMG, what have I done :argh:

Image
 
#37 ·
Origal colors were regal turquoise and india ivory....Kinda' wish they would have left it that way....But don't think I will be changing it back.
 
#40 ·
Planning to use black POR-15 on just about everything.....Used some on my control arms and other front suspension parts and was very impressed with it.
 
#43 ·
Good question Biil.....Basically, I'm afraid that a little while will turn into a looooong while, like the one in the garage did.....And long term, this engine will come out to be replaced with a roller motor and the dog hoiuse removed to do it right.

The car is in the driveway about two foot from the door, facing forward, with no front suspension.....So, first I would have to use a HD floor jack to roll it back to get a cherry picker in.....Then the next issue would be, where to put the engine....In my one-car garage, I already have one project car and five engines.....So, no room for another engine and transmission....Probably have a few more excuses/reasons that I'm not thinking about as well.
 
#44 ·
Quick Update

Didn't get anything done yesterday....Had to get some work done on our upcoming car show.....Will be getting back on it next week.....Posting a couple of photos....One is the frame undercarriage, which now looks clean enough to eat off of......The other is a shot of a new Taurus fan set-up that will be going back in.

Plan to upgrade the alternator to a 105 Amp, one wire and upgrade the headlight wiring as well....Lots of nickle/dime mini-projects as I go along.


Image


Image
 
#46 ·
#47 ·
What started out as a front suspension rebuild, has turned into a case of the "might as well's"....Now it has progressed into a complete under the hood and front frame restoration project....OMG! What have I done :argh:

Image

I feel your pain.
I started on what was supposed to be a paint job and some fresh brightwork about a year and a half ago.
I plan to have the frame back under the car hopefully by May. :sign0020:
 
#48 ·
I understand, I've got a really big shop and I"m still having to work on my truck under the carport. :rolleyes:
At least the weather is nice...well... it rained like a cow and a flat rock this morning, but the temp is nice.
Rain should be pretty much over now...for a day or so...
 
#49 ·
Must be a disease or something!

Wow David--what a familiar tune!
1. Replaced the radiator cap from a 7 to a 15---pin holes found
2. Pulled radiator--started to install new Aluminum one--doesn't fit
3. Saw leak @ front of engine--probably TC gasket
4. Pulled fan/spacer/w.pump/ps pump/alternator/hoses belts
5. Front pan gasket leaking--want to install new one
6. Tried to remove pan--no dice--crossmember in the way
7. Dropped pan as far as I could--wrestled new gasket in--2 hours
8. Reassembled all the stuff mentioned above
9. Fabricated stand-offs for new "bolt right in" radiator--hah!
10. Fan shroud won't fit
11. Cut down fan shroud--still not right
12. In laws arrive 12 days ago---truck still on blocks!:banghead:
Just about ready to shoot in-laws:blowtiedb:JIM.
 
#83 ·
Wow David--what a familiar tune!
1. Replaced the radiator cap from a 7 to a 15---pin holes found
2. Pulled radiator--started to install new Aluminum one--doesn't fit
3. Saw leak @ front of engine--probably TC gasket
4. Pulled fan/spacer/w.pump/ps pump/alternator/hoses belts
5. Front pan gasket leaking--want to install new one
6. Tried to remove pan--no dice--crossmember in the way
7. Dropped pan as far as I could--wrestled new gasket in--2 hours
8. Reassembled all the stuff mentioned above
9. Fabricated stand-offs for new "bolt right in" radiator--hah!
10. Fan shroud won't fit
11. Cut down fan shroud--still not right
12. In laws arrive 12 days ago---truck still on blocks!:banghead:
Just about ready to shoot in-laws:blowtiedb:JIM.

:congrats::congrats::sign0020::congrats::congrats::tu
Yep thats what happened to me, only add in "Dropped pan as far as I could--Wrestled gasket in--2hrs." Found that it still leaks... :sign0020:
 
#50 ·
What started out as a front suspension rebuild, has turned into a case of the "might as well's"....Now it has progressed into a complete under the hood and front frame restoration project....OMG! What have I done :argh:

Image
David, That motor is saying "Take me out Take me out" Pull the whole thing trans and all. Don't make the mistake I did and leave it in. You'll be glad you did. Jim
 
#52 ·
"I was only gonna tighten the radiator cap...

but might as well as, since I'm in here, do the...."

Kinda like my Grandma's sayin' - "So I see, said the blind man, to his deaf and dumb daughter - as he stuck his wooden arm out the window to see if it was raining."

Doesn't make any sense, but we ALL do it - just to different degrees ---sometimes, maybe, if at all possible, or sometime soon!! :banghead:

Y'all be well "N" come on over sometime if the crik don't rise.

Glad we can all laugh about it and ourselves. :happy0001:
 
#53 ·
David, be firm and stick to your plan or these guys will have you talked into pulling the body off the frame in your driveway.:sign0020::sign0020: I know all to well what happens when the "Might as Well Disease Hits". The under hood will look so much better when you are finished and when you replace the engine down the road you can pull the doghouse paint and detail the way you want. Good luck and keep posting your progress as you go. Won't be long and you will be driving it again.
Tom
 
#54 ·
Thanks for the words of support Tom....I probably should not have dug this far into it in the first place.....I just could stand how greasy, dirty, and pukey looking everything was....Should have taken more before photos....However, there is a point, where you have to realize where to stop....That is, if you want to start driving it any time soon again.
 
#55 ·
Hey Dave,
I just noticed you're from Orange Park, I live out in Ponte Vedra Beach !! Funny..

Where's that car show you mentioned you were doing something for ?

Have to meet up some time...I've only just started posting out here since my newly acquired '55 came into my world...just search on hans4811 and u can see some pics of her if you're interested...

Ken
 
#56 ·
#57 ·
HeY Dave,
Thanks for the post for your show...I'll be there...wish I could bring my 55 there !

Here's some shots of mine ...which explains why I can't bring mine !
 
#58 ·
HeY Dave,
Thanks for the post for your show...I'll be there...wish I could bring my 55 there ! Here's some shots of mine ...which explains why I can't bring mine !
Don't look too bad to me....Sent you a PM

Image
 
#59 ·
Side Motor Mounts

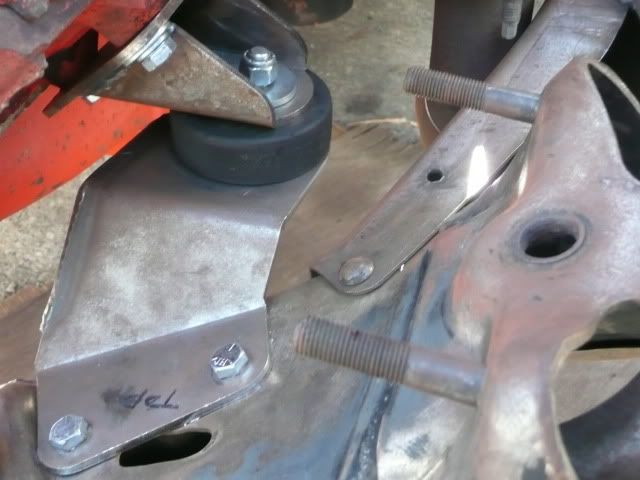
Installed a set of bolt-in, side engine mounts that I ordered from Speedway Motors:http://www.speedwaymotors.com/Speedway-1955-57-Chevy-Car-V8-Motor-Mount-Kit,52296.html They look suspiciously like CCI's http://www.classicchevy.com/chevy-side-engine-mounts-small-block-v8-1955-1957.html But, they cost $60 less.

The installation was not without its challenges, however.....Followed the instructions to the letter and they still did not want to fit....Finally, I figured out that the upper rubber cushion was just too tall to let the lower brackets sit on the cross member properly....Did not want to cut-up my new stuff....So, I went in search of a rubber cushion that would fit.....Which was 3" in diameter by 7/8" tall....See link here:http://www.trifive.com/forums/showthread.php?t=80652

I have the engine mounts installed with the hockey pucks now.....However, that may be a tempory deal.

Image


Image


Image


Image


Image
 
#60 ·
While I was doing the engine mounts, I pulled the engine forward and got behind it to do some prep work.....Sanded it all down to the start of the tunnel.....Will remove the hood next to access more of the firewall and detail the hinges.

Image


Image
 
#64 ·
Pops I just read your latest updates and now realize why you were looking for rubber pads. I used the CCI mounts before I found Speedways,(unfortunately, price-wise) the difference between the two is that CCI uses the rubber, cups, and washers from the front mount. The cup flange fits into the hole of the side mount (Just like the front) and eliminates the engine from moving around. The puck you're using may let the engine move around on that pad. Try using that puck in the old cups to keep the engine in place. See mine below.
 

Attachments

#65 ·
#66 ·
Will.....CCI's pucks and flanged washers look larger than 2" to me as well.

Image